Last Updated: 27th July 2020
Lieutenant Gray

Lieutenant Gray is essentially a DPS boss, with minimal mechanics. You need to defeat him to gain entry to the facility.
- Lt Gray has 3 bodyguards who use train doors as shields. Shield guys mitigate damage to Lieutenant Gray.
- Lt Gray Overheal: Gray has the ability to overheal himself and heal the 3 bodyguards. Maximum overheal will cause the bodyguards to drop shields and be aggressive towards agents.
This encounter is normally the quickest – Once the boss has been activated 3 bodyguards with a shield rush to protect him. They can be killed with conventional DPS, mortar turret, or sweet dreams. The shield guys near the end of the encounter become elites. When Gray starts overhealing, it can be interrupted by shooting his backpack. When his bodyguards break formation or die, Gray takes a lot more damage.
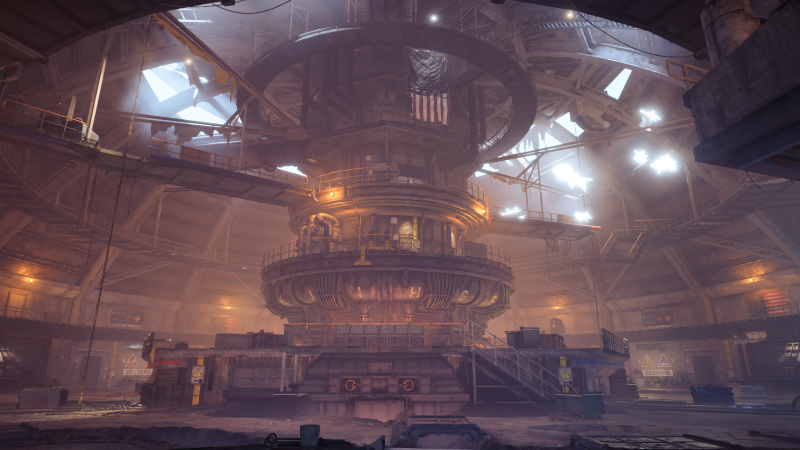
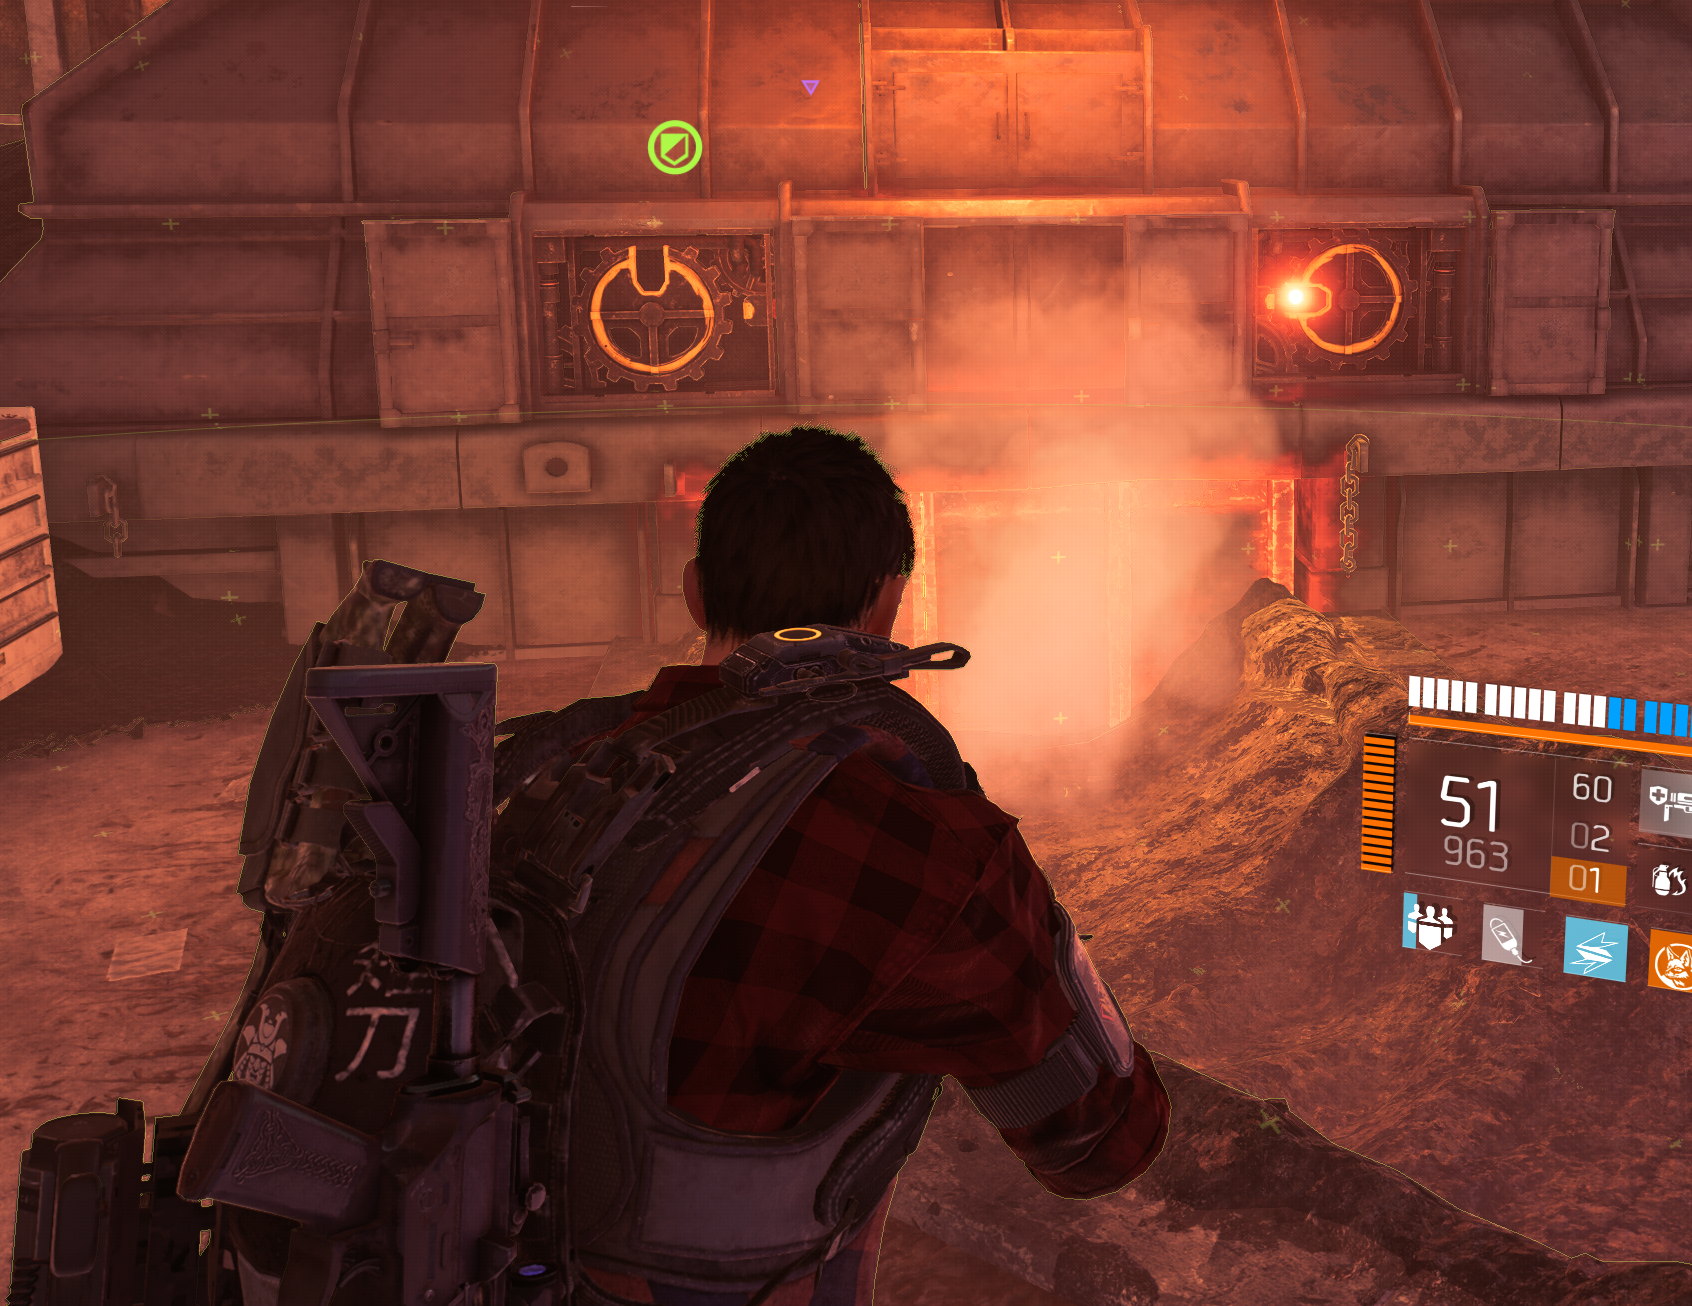
Captain Fieser
There are 2 mechanics in this encounter that result in a wipe or instakill.
- “Firestorm” is the instakill mechanic when Fieser fills the sandforge with gas, then causes an explosion killing anyone in the sandforge. This can be avoided by being in the airlock as opposed to being inside the sandforge. You can interrupt the instakill by shooting his backpack.
- The Train Turret will result in a full wipe as it fires a mortar into the control room and destroys everything – identified by the wipe siren. This can be prevent by hitting the weapon inside the forge with 2 RPG’s
Before you can defeat Fieser you must;
- spawn the boss and fill the crucible with molten lava
- move the crucible to the train car & pour it over the turret
- destroy the weapon with water.
The 3 phases above must be completed while being mindful of the Train Car wipe mechanic and Fiesers instakill.
For the first phase, a code must be correctly identified from a screen inside the sandforge above door B. The code will only have 2 characters available. Eg. M # 2. An agent in control room will describe the symbol from the identified code. Agents around the outside of the sandforge must find the symbol on the ‘wifi’ box and shoot the attached red fuse box. This must be done once to activate the boss, and 4 further times to fill the crucible (5 correct codes in total)
Below is where you would see the code in the sandforge, and what the symbol on the ‘wifi’ box will look like

The code inside sandforge above Bravo The wi-fi box with the symbol

For the second phase, the Agent in the control room moves the crucible, and lets someone in the doorway to shoot the brakes. There are 3 brakes and can not be prepped before hand.
For the 3rd and final phase before fighting Fieser, water valves around the outside of the forge need activated to get water flowing to the 2 water cannons inside the sandforge. The water needs locked in by the control room between 80-85 water pressure. If the water pressure hits 99 it will reset. The water pressure can be found 3 at Alpha, 2 at Bravo and 2 at Charlie. They are made up of 15+25 and are random per encounter. When the water pressure is locked the gun must be destroyed by 1 or 2 agents using the water cannons inside the sandforge.
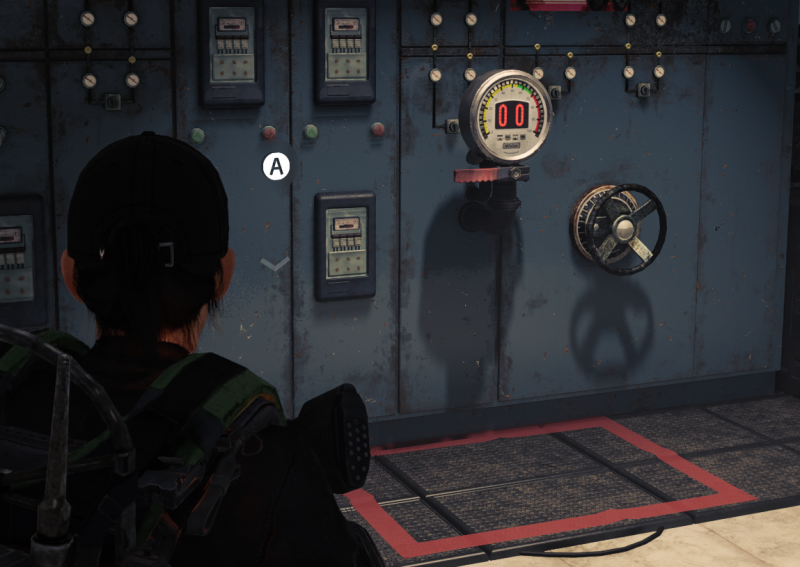
Inside the control room
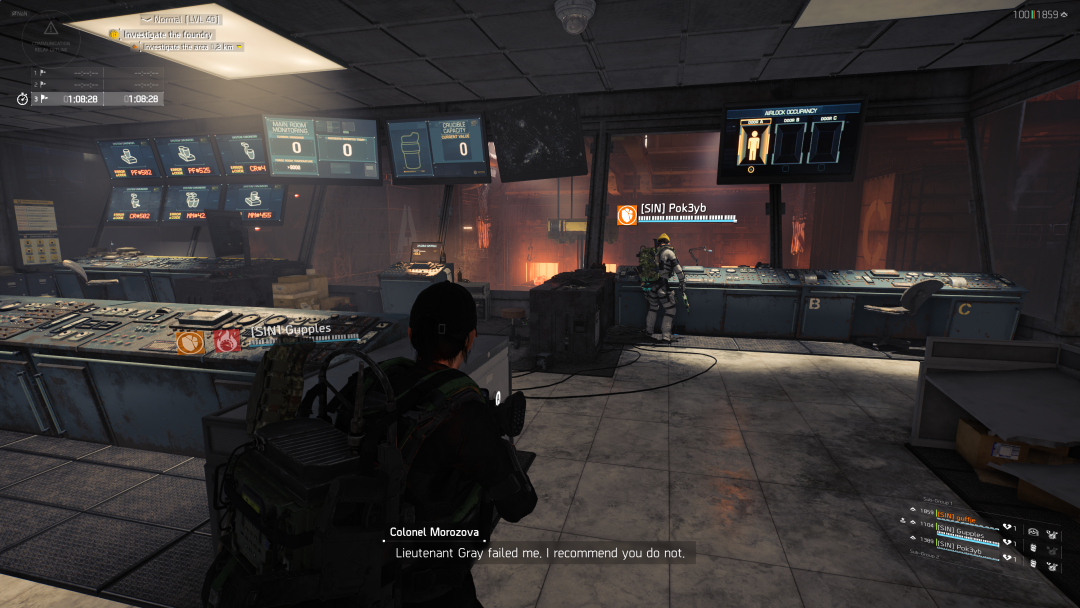
The image above shows inside the control room. The 6 symbol screens with codes are on the left. The computer to move the crucible is situated in the middle with the screen above telling you how much of the crucible is filled with molten steel. The levers for the airlocks are on the right labelled A, B, C. If you look at the screen above, it tells you when an agent is inside the airlock by lighting up.
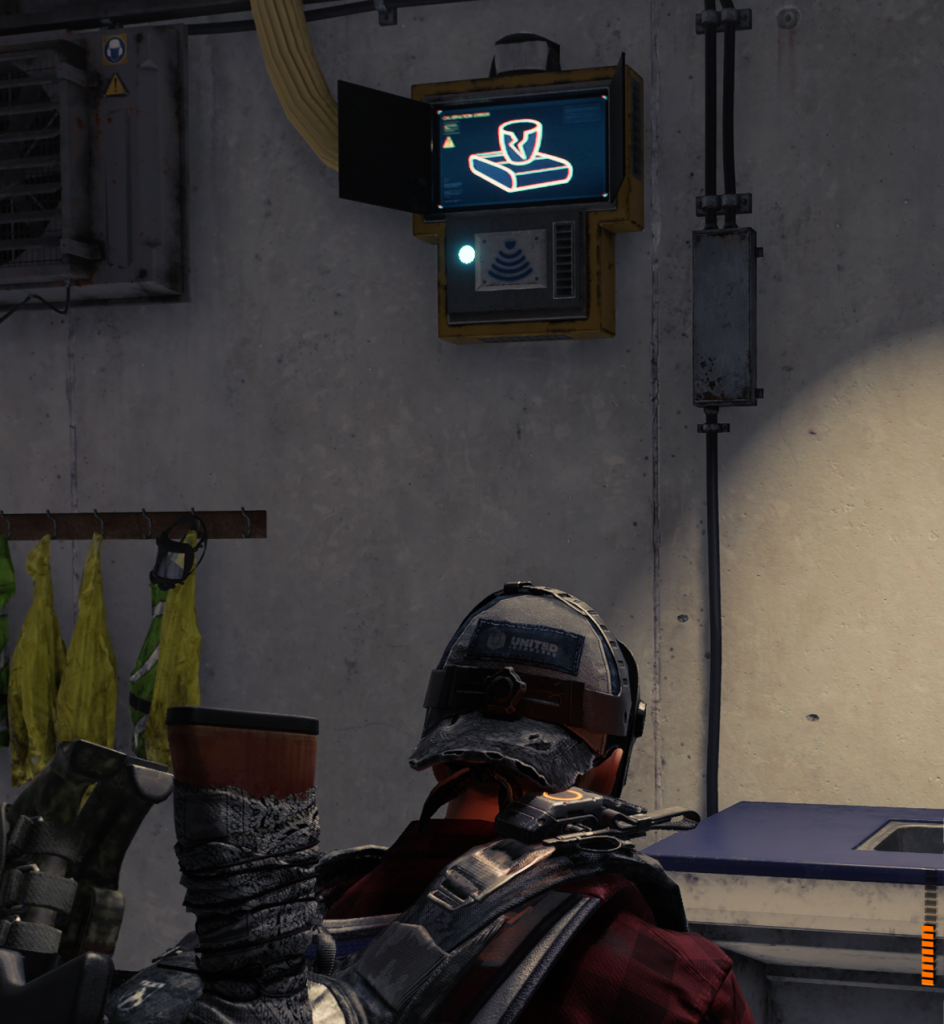
The control room is powered by electricity, and roughly every 45seconds a veteran and a heavy spawn on either side of the control room. The veteran rushes to break the electricity switch which results in nothing in the control room working. The electric can be turned on if players either side of the room flip an electric switch. The image below shows the electric switch on the left, and the red fuse box on the right.
When there is no aggro on Fieser inside the sandforge, his aggro turns to the agent in the control room. At this point he will break the glass which causes the control room to lockup meaning no agent can enter or leave, and will suffer from fire/carbon monoxide damage.
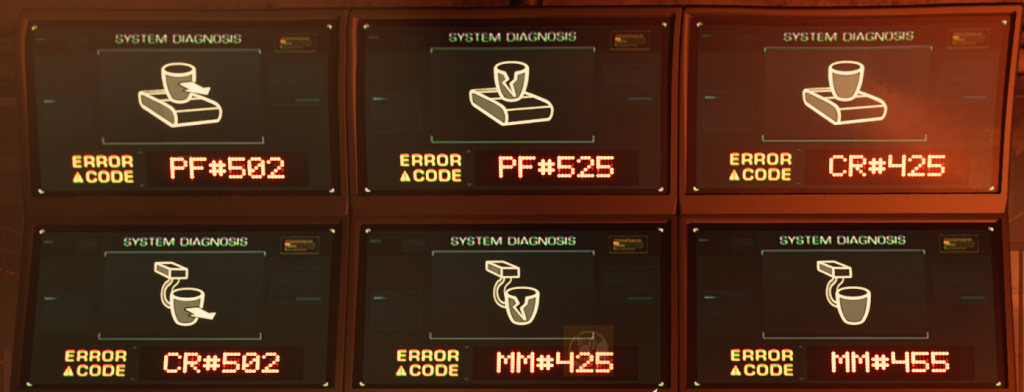
Inside the control room there are 6 screens with the following codes (the codes on the control room screens never change);
| Full codes seen in control room and corresponding screen | ||
| PF#502 | PF#525 | CR#425 |
| CR#502 | MM#425 | MM#455 |
| Codes seen in Sandforge and corresponding screen | ||
| F# 0 [1] | P # 5 [2] | C #4 [3] |
| R# 0 [4] | M # 2 [5] | #45 [6] |
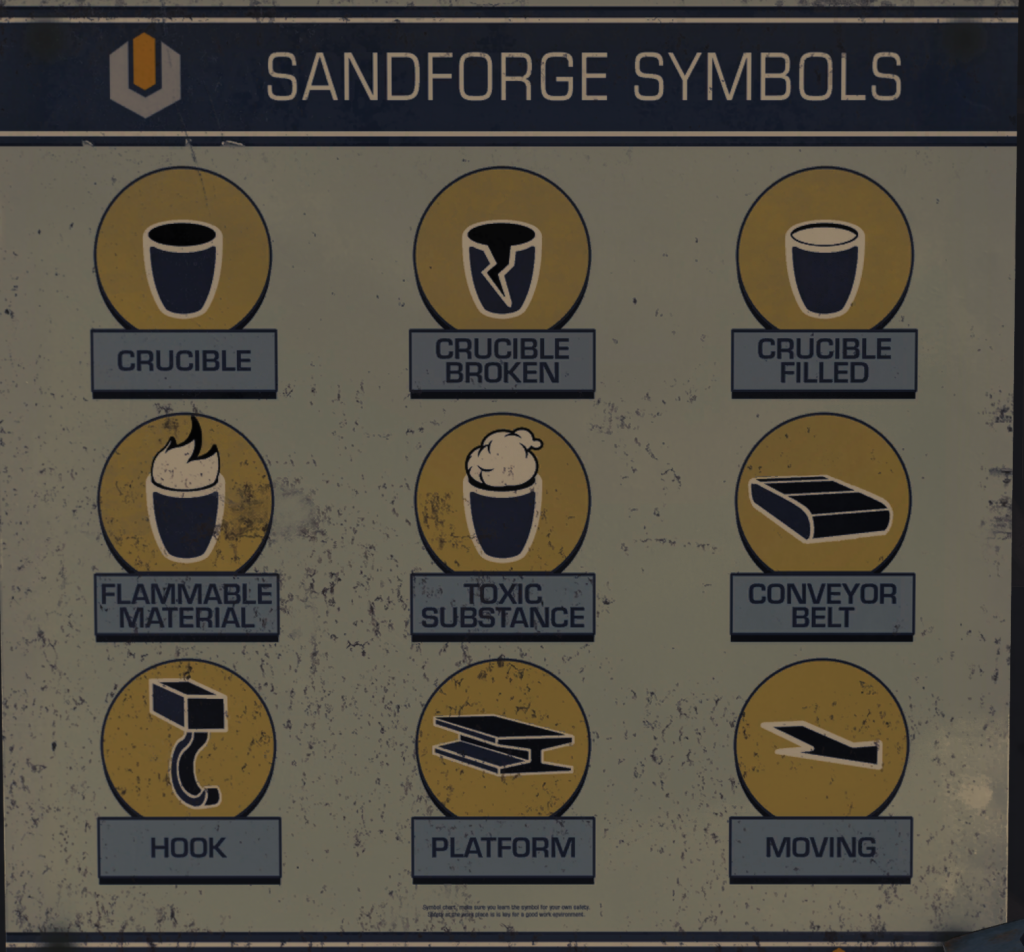
A code in the sandforge displaying ‘M # 2’ would be the bottom middle screen in the control room. Depending on the setup, the agent inside the forge can either tell the control room which monitor to look at, or give the letter to control room and let them check. Although there will be 2 monitors with P on it, P only relates to the top middle monitor. The same with Every other combination. The symbols in the photo below would be described something similar to;
- Empty cup on a conveyor with an arrow (top left)
- Broken cup on a conveyer (top middle)
- Empty cup on a conveyer (top right)
- Empty cup on a hook with an arrow (bottom left)
- Broken cup on a hook (bottom middle)
- Empty cup on a hook (bottom right)
IMPORTANT: The symbols change every time a red fuse is shot, requiring a new code to be identified inside the sandforge, and all wifi boxes checked for the new symbol as they refresh too.
There will always be a Crucible (or described cup) involved, therefore the call outs can be shortened to;
- Black belt arrow
- Broken belt
- Black belt
- Black hook arrow
- Broken hook
- Black hook
Other descriptions would be ‘double black belt’ and so on.
From the symbols below, the only ones that will never appear are; flammable material, toxic substance and platform.
When letting Agents into the sandforge, the Agent in the control room must hold the door open as it automatically closes when you let go of the lever. When you hold the lever, the door on the outside of the airlock closes, and the door into the sandforge opens.
To get the code, the Agent in the control room must hold open the airlock (A, B or C) to let an Agent in. This can be achieved by the Agent standing inside the airlock at A or C and looking at door B. When the screen is stated, the Agent in control room describes the symbol and can see if the correct symbol fuse box is shot by watching the crucible screen and seeing if it adds 25 % capacity.
When the crucible is at 100%, the middle computer in control room will light up – this will move the crucible when activated. After all 3 brakes have been destroyed, the Agent in the control room must ensure the the molten lava is tipped onto the train car weapon.
Valves must be activated around the sandforge aiming for no more than 90 water pressure. The Agent in the control room must ‘lock’ this in place between 80-85 to enable waterflow to the cannons inside the sandforge.
Lieutenant Williams
Lieutenant Williams is more complex than Captain Fieser. You must prevent the furnace exploding by constantly being aware of the pressure building inside.
There are 2 mechanics that result in a wipe or instakill.
- The wipe mechanic occurs when the pressure reaches maximum, resulting in the furnace exploding. This can be mitigated by completing the diagnostics continuously, or completing the phase below.
- The furnace has 1 instakill mechanic, which occurs everytime a console is reset after diagnostics have been completed. The usual siren sounds and anyone on the top or middle floor of the furnace dies.
To defeat Lieutenant Williams you must;
- Initiate the encounter and run diagnostics for electric (yellow), pressure (blue), and fire (red) – which will be in a random order. The first diagnostics starts the encounter, followed by 1 of each.
- Relieve the pressure in furnace lock at the bottom, 6 cogs need adjusted in order to open the doors. This exposes the molten steel which in turn needs damaged in order to release it. Do not stand directly behind it.
- Obtain ideal pressure for the furnace by shooting valves A through to P (8 valves will need adjusted). This will lock the pressure and spawn the final boss encounter which has a time limit.
- After killing Williams, he will drop a key which needs to go into the Emergency shutdown computer at the top, with all 3 computers being reset. This needs completed within 30seconds.
Running Diagnostics
The simplified process: An Agent must run a diagnostics computer at the top of the furnace, other agents need to rectify the malfunctions and an agent must reset the console on the ground floor. Resetting the console initiates a wipe mechanic from the furnace – anyone on the top or middle floor will need to jump off. It will also spawn the boss directly behind the computer who will become immune and run away after 2 bars of damage have been completed. The boss will only spawn 3 times from the consoles.
The Agent running diagnostics can hold the button in, or press it and it will last a few seconds – a light will stop flashing when diagnostics are no longer available. The wipe mechanic will also cause a light to flash above the diagnostic console as the siren sounds.
- Electric malfunctions are indicated by yellow/electric panels sparking
- the 3 panels must be switched on. These can be found on the top and middle floor of furnace, and on the outside and inside of the ground floor.
- Pressure will result in purple pipes with valves leaking gas
- the 3 valves need rotated, and can only be found on the middle floor of the furnace
- Fire will be red pipes that release fire from the side.
- when the fire valve is found (there are only 4), it must be held so that the Agent on top of the furnace can reach the diagnostic computer. there are 2 valves at the fire console and 1 between fire/electric, and electric/pressure.
Correctly doing the 6 bars of damage to the boss and the 3 diagnostics (4 in total) will cause lights to come on at the bottom of the furnace in order to release the molten steel.
Gear cogs and releasing molten steel
Gear cogs and the molten steel are a little easier to explain, but get complicated by the fact the boss spawns and has a sticky seeker mine.
Someone must get on the middle floor of the furnace and start turning the 2 valves so that the gear cogs line up, the cog on the right will turn anticlockwise and the left will turn clockwise. The “pacman” needs to line up with the yellow lock which turns into a light when done correctly.
The agent moving the cogs isn’t able to see how many are left and someone needs to relay to him (adjusting for comms delay). In the picture above, the cog on the right is aligned. The cog on the left isn’t. To align the cog on the left there is a quarter left which is the equivalent of 3 ‘movements’. When the cog is in place, there is a loud clinking noise. All right cogs will need to be at the 9 o’clock position, and left valves will be at the 3 o’clock position. Every encounter will have the cogs randomized.
When all 6 cogs are lined up, the orange lights should be destroyed which causes the safety gate at the bottom to open. At this point the molten steel needs shot so that it fills the trench on the floor. Do not run directly behind the molten steel when shooting it – it will instakill you.
If you successfully open all 3 molten steel gates, the lights on the bottom floor of the furnace will light up and you now need to stabilize pressure.
Stabilizing pressure

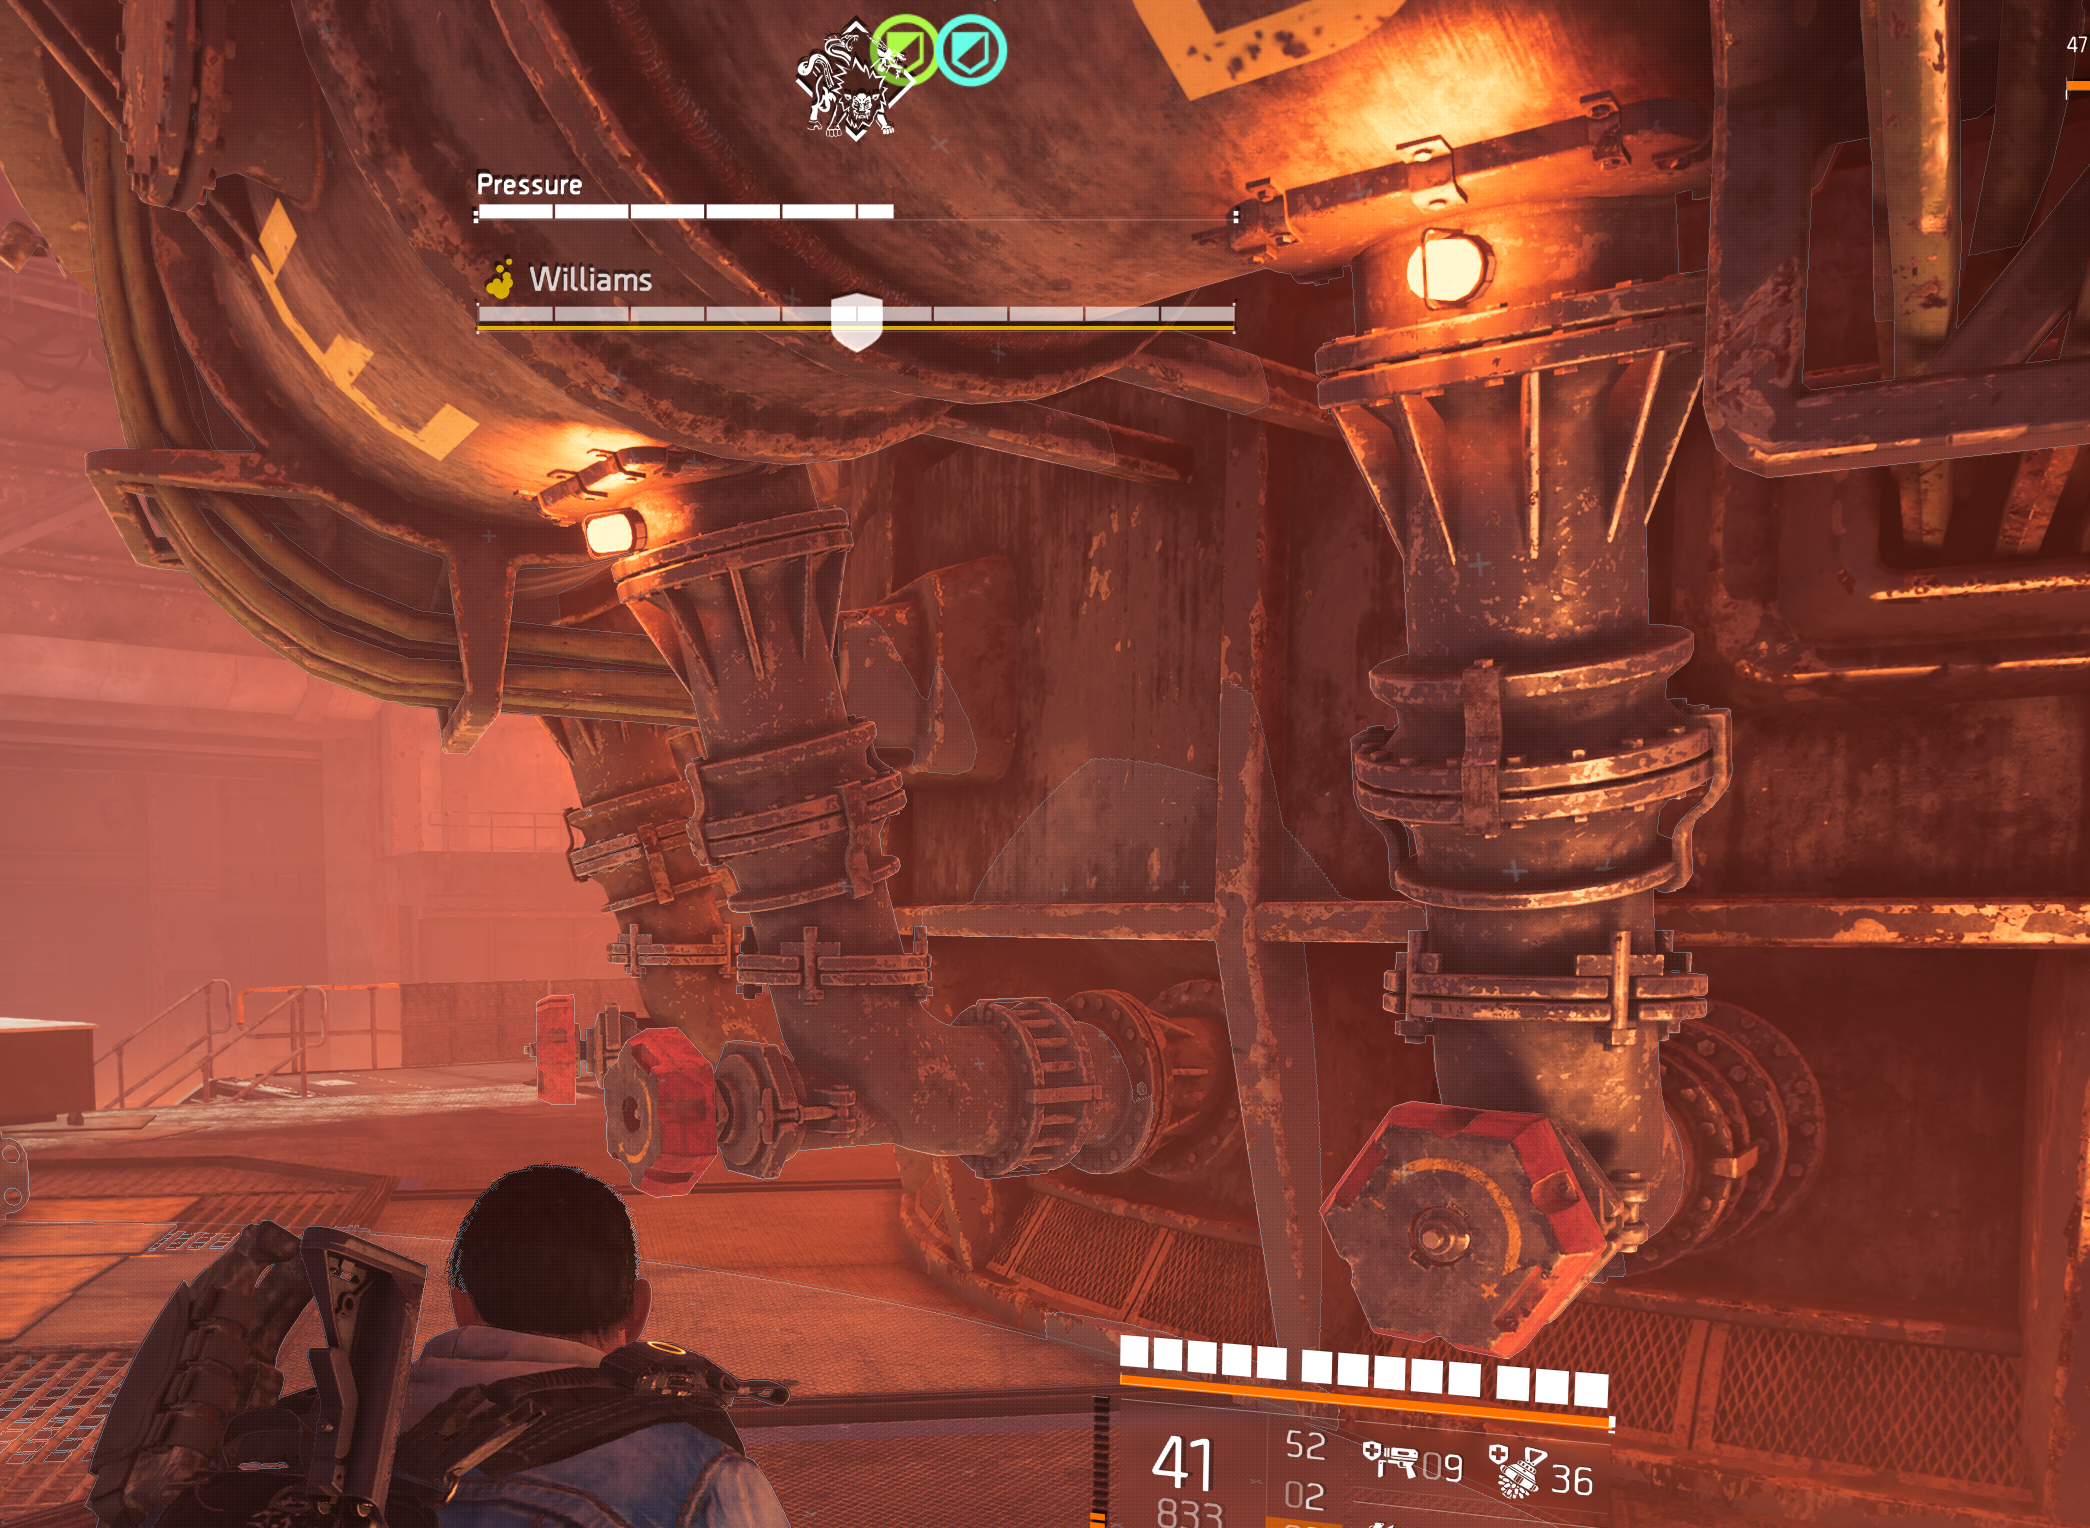
In order to stabilize the furnace, an agent needs to be on the top floor in order to read the screen above. If there is fire, you will need to open a valve and go through the diagnostic once more to access the screen.
There will be an agent on the ground floor of the furnace looking at valves that are labelled A through to P in clockwise direction. From the screen, the agent at the top must state what needs done with the valves – above would be
- Bravo and Charlie less pressure
- Delta more pressure
The agent on the bottom of the furnace must shoot the side of the valve to turn it – the valve must ‘tighten’ to add more pressure, and ‘loosen’ to relieve pressure. If the agent is facing Alpha ready to run clockwise, shooting the top will loosen it, and shooting the bottom will tighten it. There will be 8 valves to modify. Once that is complete you move in to final section
Defeating Williams and Emergency Shutdown
There will be 3 turrets on the outter middle ring, which the boss will take up as the pressure valves are being adjusted. There are RPG’s that drop which destroy the turret, or people can shoot the weakpoint. As the pressure stabilizes there will be a time limit (up to 3m30 depending on how much pressure was left on stabilization) in order to kill Williams. Williams will have his seeker mines lock people down. Agents must hipfire at their feet or shoot teammates feet in order to free them – you are unable to break out of the foam otherwise. Williams also has a satchel of poision which will attack and kill agents health – completing disregarding armor if they get in its path.
Williams at this point will also have a healing mechanic on his backpack which heals him very quickly. A demolisher firefly can pop it temporarily, otherwise people will need to focus fire on it. When Williams has been killed, he drops the masterkey. At this point you have 30seconds to finish the encounter – the key must immediately be brought to the top of the furnace and inserted into the emergency shutdown console. There must be an agent at each of the 3 consoles to reset it one final time to end the encounter.
Phases of Williams
At different times of the encounter, Williams will spawn. He is armed with poision that will kill agents, and seeker mines that will lock agents down. He spawns for the first 3 diagnostics but will run out of the furnace after 2 bars of damage each time.
The next time he spawns will be as soon as the first molten steel gate has opened. After all 3 gates are opened and Williams has taken enough damage, he will next appear on the middle outside floor and start using 3 turrets. These can be destroyed with RPG’s or by shooting the weakpoint. Once pressure is stabilized and all 3 turrets are destroyed, he will jump onto the ground floor for the final encounter.
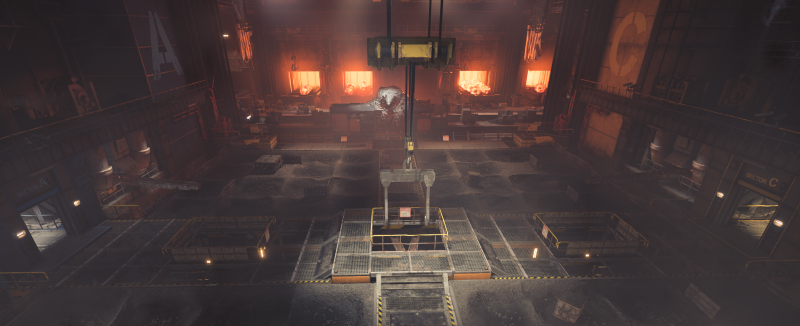
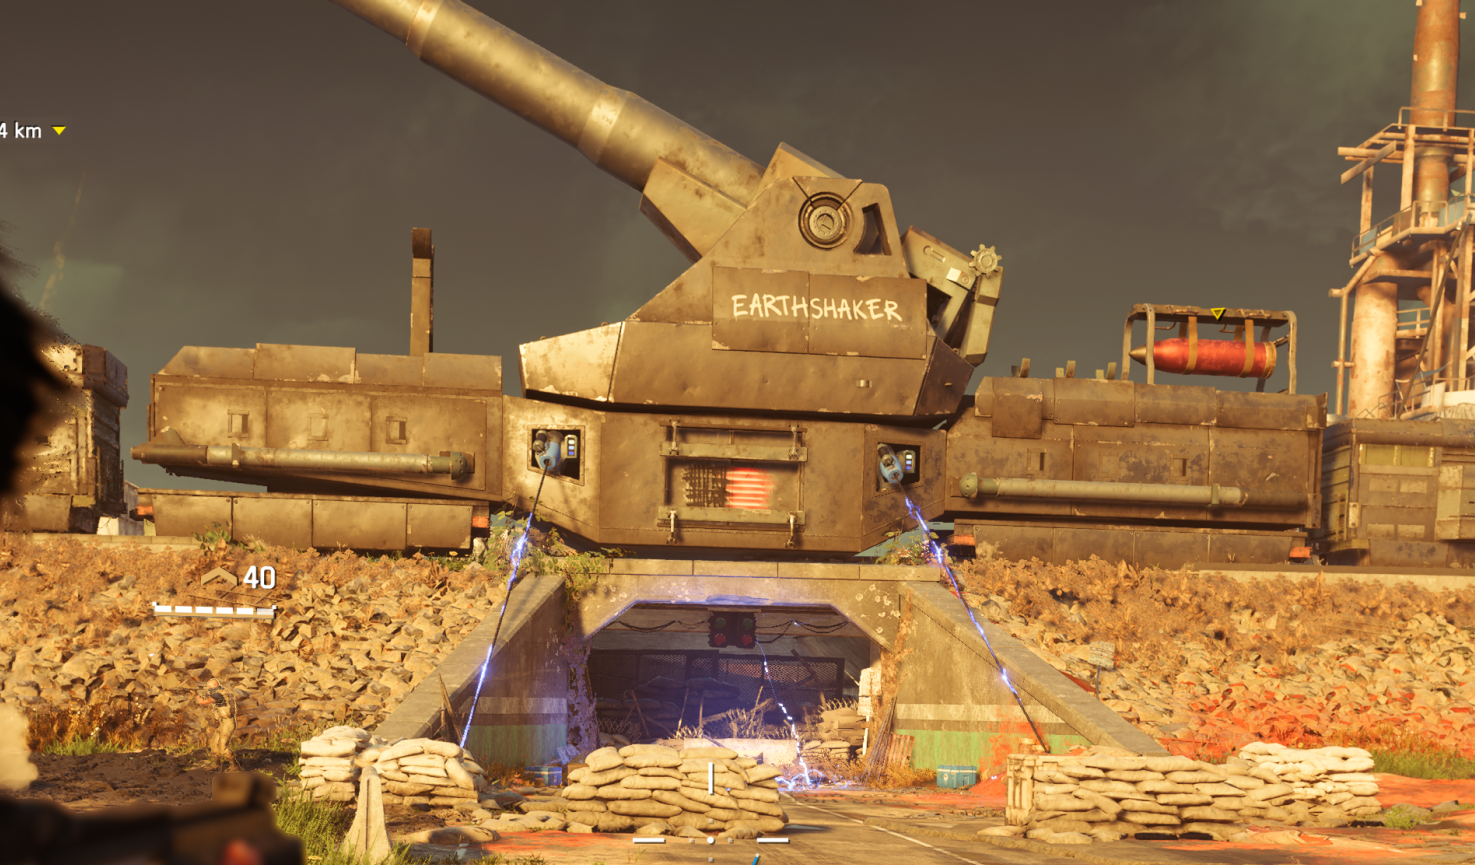
Colonel Morozova / Iron Horse
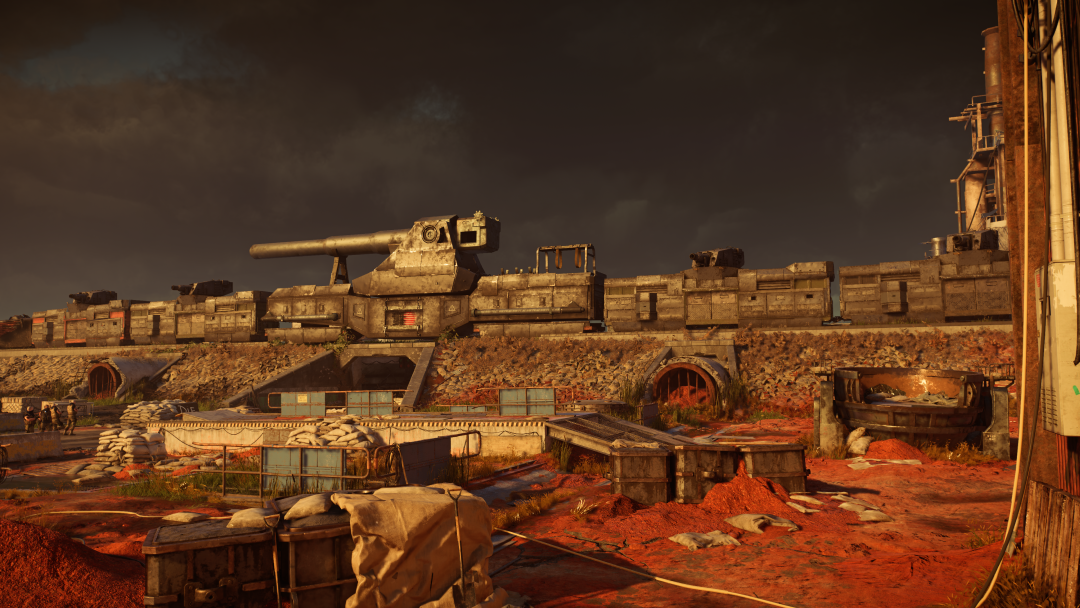
The final boss(es). This encounter has 1 wipe mechanic and 1 instakill mechanic.
- Earthshaker, the middle of the 5 carriages, has a large cannon on it. Each phase a Red Missile is pushed up from the carriage and makes its way to the cannon, the missile needs 6 RPG’s to stop it from firing in that phase. Whilst the missile is being loaded, Iron Horse has Shock Harpoons fired into the ground – running into that electricity at the bridge is an instakill.
- Airstrike: an instakill mechanic that Morozova calls in when she takes too much damage in that phase. Can only be survived if you prevent Earthshaker firing, clearing the Shock Harpoons from under the bridge.
Morozova also has a shoulder-mounted Missile Launcher called the “Reckoning”. This will lock on to random agents throughout the encounter as soon as she is active. As each phase goes on, her ‘Fury’ will increase and the Reckoning will become stronger and fire faster. The only way to prevent her firing is to stagger her with explosives – Grenade Launcher, Merciless, Ravenous etc.
The encounter begins as soon as you run in.
- Phase 1: Destroy missile, override auto cannon with a key 4 times to open up 4 mortars, temporarily disable them, spawn & hide from Morozova (bridge)
- Phase 2: Destroy missile, damage 3 bars on Morozova, bridge
- Phase 3: Destroy missile, damage 3 bars on Morozova, bridge. This brings up an Ironhorse health bar.
- Phase 4: Destroy missile, use 3 keys to override auto cannon which will permanently destroy mortar 1 & 2 (key 1), mortar 3 & 4 (key 2), and take ironhorse to 1% health. Damage Morozova until there is no armor bar left, go to bridge for last time.
- Phase 5: Kill Morozova then finish Ironhorse off with 1 RPG to the Red missile which loads very quickly.
RPG’s

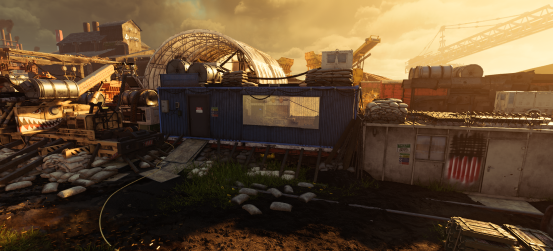
RPG’s spawn on each side of the map. One will spawn on the side as you enter via the warehouse (referred to as the right side) in the picture above. The RPG NPC will spawn high then drop down.
The other RPG spawns on the other side of the map from the warehouse as you enter (referred to as left side), and comes out of the door to the right of the True Sons flag.
New Heavy & Override Key

The new True Sons heavy has the ability to run, go into cover an roll, all whilst in posession of a foam gun to lock you down. He spawns from one of the doors on the train and after killing him, will drop you an override key for the Auto Cannon.

The Agent who picks up the override key must stand close to the Auto Cannon in a circle until it reaches 100%, and override the Auto Cannon as the pre-fire warning is sounded.
Bridge

In the picture above you can see there are 5 green lines where you should not cross when taking cover from Morozova.